Telnet Сервер + Смена ip с помощью Web Сервера
- Войдите на сайт для отправки комментариев
Ср, 23/01/2013 - 17:39
Вводные данные:
Блок питания 12 В
/*                             *
 *  Arduino Telnet Server      *
 *      7 July 2010            *
 *   Basic Arduino I/O via     *
 *  a command line interface   *
 *      by Steve Lentz         *
 * stlentz[at]gmail[dot]com   *

 Quick Start Instructions:
 1) Set Ethernet address in code below.
 2) Compile and upload sketch.
 3) Connect Arduino to Ethernet.
    Make sure link light is on.
 4) Telnet to Arduino's IP.
 5) On some Telnet clients, hit return to wake up connection.
 6) When connected, type ? <cr> for help.
 7) Try a simple command such as 'ar'.

Other notes
Tested on Duemilanove with Ethernet Shield.
Should work on compatible boards.
Tested with Win XP, OS X, and Debian Telnet clients.
Compiles to about 9 KB, can be made smaller by removing
  unneeded commands, help message, etc.
I am an entirely self-taught C programmer; if you
  don't like my code, too bad ;-).  */


// Ethernet parameters
#include <Ethernet.h>

byte mac[] =     { 0xDE, 0xAD, 0xBE, 0xEF, 0xFE, 0xED };
byte ip[]  =     {192, 168, 1, 7 };
byte gateway[] = {192, 168, 1, 1 };
byte subnet[]  = {255, 255, 255, 0 };

// Other global variables
#define textBuffSize 9 //length of longest command string plus two spaces for CR + LF
char textBuff[textBuffSize]; //someplace to put received text
int charsReceived = 0;

boolean connectFlag = 0; //we'll use a flag separate from client.connected
                         //so we can recognize when a new connection has been created
unsigned long timeOfLastActivity; //time in milliseconds of last activity
unsigned long allowedConnectTime = 300000; //five minutes

Server server(23); // Telnet listens on port 23
Client client = 0; // Client needs to have global scope so it can be called
                   // from functions outside of loop, but we don't know
                   // what client is yet, so creating an empty object

void setup()
{
  // setting pins 0 to 9 as outputs
  // pins 10-13 are used by the Ethernet Shield
  for(int  i= 0; i < 10; i++)  pinMode(i, OUTPUT);

  Ethernet.begin(mac, ip, gateway, subnet);
  server.begin();
}

void loop()
{
  // look to see if a new connection is created,
  // print welcome message, set connected flag
  if (server.available() && !connectFlag) {
    connectFlag = 1;
    client = server.available();
    client.println("\nSteve's Arduino Telnet Server");
    client.println("? for help");
    printPrompt();
  }

  // check to see if text received
  if (client.connected() && client.available()) getReceivedText();

  // check to see if connection has timed out
  if(connectFlag) checkConnectionTimeout();

// code to do other things in loop would go here

}


void printPrompt()
{
  timeOfLastActivity = millis();
  client.flush();
  charsReceived = 0; //count of characters received
  client.print("\n>");
}


void checkConnectionTimeout()
{
  if(millis() - timeOfLastActivity > allowedConnectTime) {
    client.println();
    client.println("Timeout disconnect.");
    client.stop();
    connectFlag = 0;
  }
}


void getReceivedText()
{
  char c;
  int charsWaiting;

  // copy waiting characters into textBuff
  //until textBuff full, CR received, or no more characters
  charsWaiting = client.available();
  do {
    c = client.read();
    textBuff[charsReceived] = c;
    charsReceived++;
    charsWaiting--;
  }
  while(charsReceived <= textBuffSize && c != 0x0d && charsWaiting > 0);

  //if CR found go look at received text and execute command
  if(c == 0x0d) {
    parseReceivedText();
    // after completing command, print a new prompt
    printPrompt();
  }

  // if textBuff full without reaching a CR, print an error message
  if(charsReceived >= textBuffSize) {
    client.println();
    printErrorMessage();
    printPrompt();
  }
  // if textBuff not full and no CR, do nothing else;
  // go back to loop until more characters are received

}


void parseReceivedText()
{
  // look at first character and decide what to do
  switch (textBuff[0]) {
    case 'a' : doAnalogCommand();        break;
    case 'd' : doDigitalCommand();       break;
    case 'p' : setPinMode();             break;
    case 'c' : checkCloseConnection();   break;
    case '?' : printHelpMessage();       break;
    case 0x0d :                          break;  //ignore a carriage return
    default: printErrorMessage();        break;
  }
 }


void doDigitalCommand()
  // if we got here, textBuff[0] = 'd'
{
  switch (textBuff[1]) {
    case 'r' : readDigitalPins(); break;
    case 'w' : writeDigitalPin(); break;
    default: printErrorMessage(); break;
  }
}


void readDigitalPins()
  // if we got here, textBuff[0] = 'd' and textBuff[1] = 'r'
{
  int pin;
  if (textBuff[2] == 0x0d) {
  // output the valueof each digital pin
    for (int i = 0; i < 10; i++) outputPinState(i);
  }
  else {
    pin = parseDigit(textBuff[2]);
    if(pin >=0 && pin <=9) outputPinState(pin);
    else printErrorMessage();
  }
}


void outputPinState(int pin)
{
  client.print("digital pin ");
  client.print(pin);
  client.print(" is ");
  if (digitalRead(pin)) {
    client.println("HIGH");
  }
  else
    client.println("LOW");
}


void writeDigitalPin()
  // if we got here, textBuff[0] = 'd' and textBuff[1] = 'w'
{
  int pin = -1;
  int pinSetting = -1;
  if (textBuff[3] == '=' && textBuff[6] == 0x0d) {
        //if yes, get the pin number, setting, and set the pin
        pin = parseDigit(textBuff[2]);
        pinSetting = parsePinSetting();
        if(pin > -1 && pinSetting == 0) {
          digitalWrite(pin, LOW);
          client.println("OK");
        }
        if(pin > -1 && pinSetting == 1) {
          digitalWrite(pin, HIGH);
          client.println("OK");
        }
        if(pin < 0 || pinSetting < 0) printErrorMessage();
      }
   else printErrorMessage();
}


int parsePinSetting()
//look in the text buffer to find the pin setting
//return -1 if not valid
{
  int pinSetting = -1;
  if(textBuff[4] == 'l' && textBuff[5] == 'o') pinSetting = 0;
  if(textBuff[4] == 'h' && textBuff[5] == 'i') pinSetting = 1;
  return pinSetting;
}


void doAnalogCommand()
  // if we got here, textBuff[0] = 'a'
{
  switch (textBuff[1]) {
    case 'r' : readAnalogPins(); break;
    case 'w' : writeAnalogPin(); break;
    default: printErrorMessage(); break;
  }
}


void readAnalogPins()
  // if we got here, textBuff[0] = 'a' and textBuff[1] = 'r'
  // check textBuff[2] is a CR then
  // output the value of each analog input pin
{
  if(textBuff[2] == 0x0d) {
    for (int i = 0; i < 6; i++) {
      client.print("analog input ");
      client.print(i);
      client.print(" is ");
      client.println(analogRead(i));
    }
  }
  else printErrorMessage();
}


void writeAnalogPin()
  // if we got here, textBuff[0] = 'a' and textBuff[1] = 'w'
{
  int pin = -1;
  int pwmSetting = -1;
   if (textBuff[3] == '=') {
      //if yes, get the pin number, setting, and set the pin
      pin = parseDigit(textBuff[2]);
      if(pin == 3 || pin == 5 || pin == 6 || pin == 9) {
        pwmSetting = parsepwmSetting();
        if(pwmSetting >= 0 && pwmSetting <= 255) {
          analogWrite(pin,pwmSetting);
          client.println("OK");
        }
        else printErrorMessage();
      }
      else printErrorMessage();
    }
   else printErrorMessage();
}


int parsepwmSetting()
{
  int pwmSetting = 0;
  int textPosition = 4;  //start at textBuff[4]
  int digit;
  do {
    digit = parseDigit(textBuff[textPosition]); //look for a digit in textBuff
    if (digit >= 0 && digit <=9) {              //if digit found
      pwmSetting = pwmSetting * 10 + digit;     //shift previous result and add new digit
    }
    else pwmSetting = -1;
    textPosition++;                             //go to the next position in textBuff
  }
  //if not at end of textBuff and not found a CR and not had an error, keep going
  while(textPosition < 7 && textBuff[textPosition] != 0x0d && pwmSetting > -1);
   //if value is not followed by a CR, return an error
  if(textBuff[textPosition] != 0x0d) pwmSetting = -1;
  return pwmSetting;
}
void setPinMode()
  // if we got here, textBuff[0] = 'p'
{
  int pin = -1;
  int pinModeSetting = -1;
  if (textBuff[1] == 'm' && textBuff[3] == '=' && textBuff[6] == 0x0d) {
        //if yes, get the pin number, setting, and set the pin
        pin = parseDigit(textBuff[2]);
        pinModeSetting = parseModeSetting();
        if(pin > -1 && pinModeSetting == 0) {
          pinMode(pin, OUTPUT);
          client.println("OK");
        }
        if(pin > -1 && pinModeSetting == 1) {
          pinMode(pin, INPUT);
          client.println("OK");
        }
        if(pin < 0 || pinModeSetting < 0) printErrorMessage();
      }
   else printErrorMessage();
}


int parseModeSetting()
//look in the text buffer to find the pin setting
//return -1 if not valid
{
  int pinSetting = -1;
  if(textBuff[4] == 'o' && textBuff[5] == 'u') pinSetting = 0;
  if(textBuff[4] == 'i' && textBuff[5] == 'n') pinSetting = 1;
  return pinSetting;
}


int parseDigit(char c)
{
  int digit = -1;
  digit = (int) c - 0x30; // subtracting 0x30 from ASCII code gives value
  if(digit < 0 || digit > 9) digit = -1;
  return digit;
}


void printErrorMessage()
{
  client.println("Unrecognized command.  ? for help.");
}


void checkCloseConnection()
  // if we got here, textBuff[0] = 'c', check the next two
  // characters to make sure the command is valid
{
  if (textBuff[1] == 'l' && textBuff[2] == 0x0d)
    closeConnection();
  else
    printErrorMessage();
}


void closeConnection()
{
  client.println("\nBye.\n");
  client.stop();
  connectFlag = 0;
}


void printHelpMessage()
{
  client.println("\nExamples of supported commands:\n");
  client.println("  dr       -digital read:   returns state of digital pins 0 to 9");
  client.println("  dr4      -digital read:   returns state of pin 4 only");
  client.println("  ar       -analog read:    returns all analog inputs");
  client.println("  dw0=hi   -digital write:  turn pin 0 on  valid pins are 0 to 9");
  client.println("  dw0=lo   -digital write:  turn pin 0 off valid pins are 0 to 9");
  client.println("  aw3=222  -analog write:   set digital pin 3 to PWM value 222");
  client.println("                              allowed pins are 3,5,6,9");
  client.println("                              allowed PWM range 0 to 255");
  client.println("  pm0=in   -pin mode:       set pin 0 to INPUT  valid pins are 0 to 9");
  client.println("  pm0=ou   -pin mode:       set pin 0 to OUTPUT valid pins are 0 to 9");
  client.println("  cl       -close connection");
  client.println("  ?        -print this help message");
}
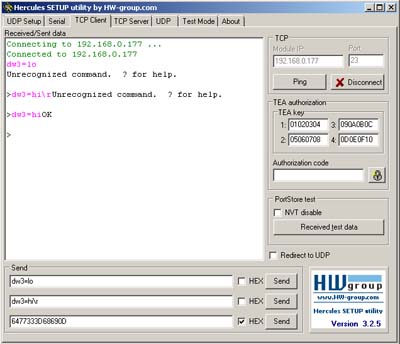
- Программа Hercules
Что получилось:
- Залить скетч п. 5, на Arduino Ethernet п.1 с помощью Адаптера USB Serial.
2. Пропинговать Arduino Ethernet п.1, с помощью “Ping 192.168.XXX,YYY»
- Подключиться к Telnet Server(у) Arduino Ethernet п.1.
4. Управлять реле на Relay Sheild for Arduino п.3 с помощью команд из помощи Telnet Server(а), которая вызвается по вводу знака вопроса “?”.
Что необходимо сделать:
1. В Hercules не получается, автоматически осуществить перевод каретки при отправки на Telnet Server в символах «dw3=hi\r» пишет не правильная команда, то есть нужно отправить dw3=hi и обязательно нажать Enter, но если отослать то же самое «dw3=hi\r» в HEX символах: 6477333D68690D, перевод картеки осуществляется реле управляется.
2. В Arduino Ethernet, ip адрес прошивается в скетче, можно ли на Arduino Ethernet поднять Web сервер и менять Ip адрес, без заливки скетча.
byte ip[]  =     {192, 168, XXX,YYY };
byte gateway[] = {192, 168, 0, 1 };
byte subnet[]  = {255, 255, 255, 0 };
это для wiznet
а для ENC28J60 что то подобное есть?
при использовании IDE 1.0.3 пришлось переименовать класс "Server" в"EthernetServer"
а вот что делать с Client не могу понять: